
Light Cheesecake Cupcakes with Topping Recipe
27.01.2015 by LadyAlly
For those who were at church for the Christmas service and breakfast session last month, would remember the little cheesecake cupcake bites I made that had 2 different toppings – one with Santa hat, and another with raspberry compote and chocolate shards. For those who didn’t get to try it, here is the recipe in case you wanna make it since I am not sure when I am able to cook fancy stuff with the little #bbquah being fussy and demanding. Haha.
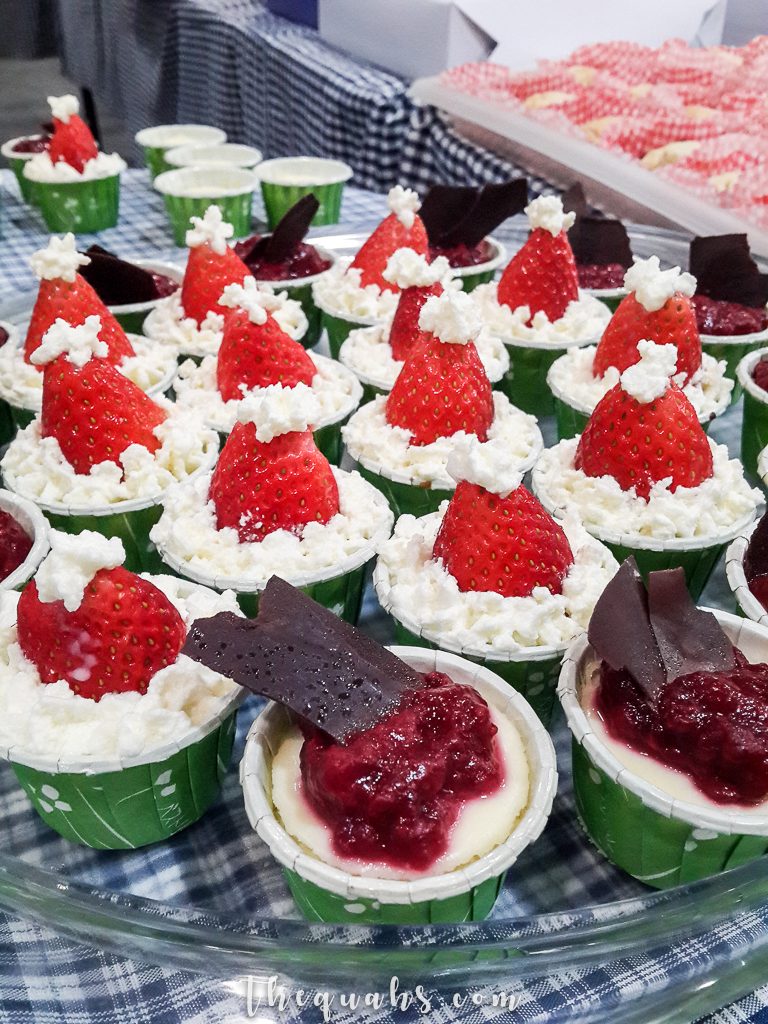
Anyway, this is quite a long recipe since there is quite a few different parts to it. Other than the compote and chocolate shards which I made earlier and kept in the fridge, the rest was made the day before. (Sorry for the poor photo, since I was in a hurry taking this photo during Christmas service).
Ingredients (For cake)
- 130g Digestives biscuits
- 1 1/2 cups granulated sugar
- 3 1/2 tbsp butter, melted
- 2 packets of 225g cream cheese, softened at room temperature
- 3/4 tbsp granulated sugar
- 1 1/2 tbsp all-purpose flour
- 2 large eggs
- 1 tsp vanilla extract
- 1/4 cup sour cream
- 1/4 cup thickened cream
Directions (For cake)
The base
- Preheat oven to 180°C.
- In a food processor, pulse the Digestive biscuits until crumble. Add the 3/4 tbsp sugar and melted butter and pulse until well-mixed.
- Divide the crumbled mixture among the cupcake cups/liners. If you use the same size as I did, which is the 35mm in diameter based hard cups, this recipe should make approximately 20 cups or so.
- Press the biscuit down with a teaspoon or your finger into an even layer and make sure it is compact so it doesn’t become too crumbly when removing it from the liners.
- Place them in the fridge to harden.
The filling
- In a large bowl, whisk together 1 1/2 cups of granulated sugar and the flour till well blended.
- In a mixing bowl, add softened cream cheese. Pour the sugar-flour mixture on top.
- Blend on low speed using the mixer until smooth.
- Add the eggs one at a time while mixer on low speed, while using a spatula to scrape the bottom and sides to ensure everything is well mixed.
- Add vanilla, sour cream and thickening cream until just combined.
- Remove the mixing bowl and tap it on the counter about 30 times to remove the air bubbles trapped in it.
- Divide the mixture amongst the cups. If you intend to have toppings, fill the cups to almost 3/4 full. To ensure less spillage, you can opt to put the mixture in a piping bag so that the mix doesn’t drip all over the place or the corners of the cups.
- Bake in oven for approximately 10-20 minutes, or until the centre jiggles a little.
IMPORTANT: Do not remove immediately from oven once cooked or the centre of the cake will sink. Open the oven door a little to release some heat and after a while only remove the cakes. - Cool on a rack for about 1 hour.
- Loosely cover with cling wrap or aluminium foil and chill in fridge for at least 2 hours.
Ingredients (For Santa Hat topping)
- Small fresh strawberries. (Korean strawberries are the sweetest IMHO)
- 2 tbsp icing sugar
- 1/2 cup thickening cream
Directions (For Santa Hat topping)
- Using a mixer, whip the cream on high speed until soft peaks form.
- Add icing sugar and whip until stiff peaks form.
- Put in a piping bag with a decorative piping tip. (I used a star tip that I bought from Daiso. Pretty worth it since it was RM5 for 3 tips. Haha.)
- Cut the strawberries flat to remove the head (where the green leaves are), and place the flat part on the cake. I piped a bit of the whipped cream on the strawberry before putting on the cake to stop it from sliding around (just in case).
- Pipe little stars around the strawberry and one on the tip of the strawberry to make it look like a Santa Hat.
NOTE: It would be better to prepare the whipped cream and pipe just before serving, as whipped cream will start to “leak” water after a while, especially in Malaysian weather.
Ingredients (For raspberry compote)
- 1 cup frozen raspberries
- 2 tbsp icing sugar
Directions (For raspberry compote)
- Place frozen raspberries in a small pot over the stove on low fire.
- Add icing sugar.
- Stir and mix well. Cook until preferred consistency (whether you like it with chunky bits or totally mashed. The longer you cook, the lesser the chunks).
- Leave it to cool outside. Place in refrigerator to be chilled once cooled.
Ingredients (For chocolate shards)
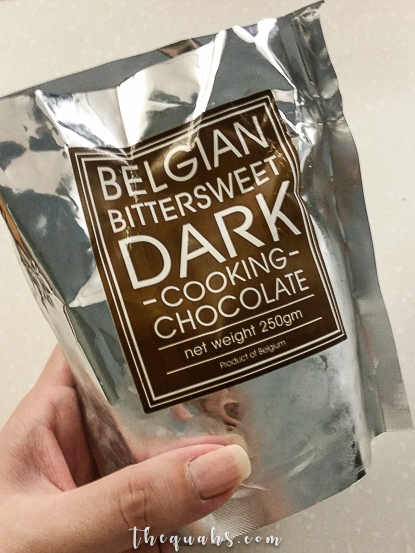
- 240g dark cooking chocolate chips, divided to 180g and 60g parts.
NOTE: Make sure to check the ingredients. Choose chocolate that is 60-70% made from COCOA, and not palm oil. Currently, I am using this brand I buy from Jaya Grocers. Here is a photo of it. It is cheap(er) and good, and made from real cocoa.
Directions (For chocolate shards)
- You will need a flexible spatula, kitchen thermometer, a metal bowl, a saucepan and either a silicon sheet or parchment paper.
- Place 180g of chocolate chips in a metal bowl, and place that metal bowl on a saucepan with 1 inch of water at the bottom. Make sure the metal bowl is at least 1 inch above the surface of the water and not resting on it.
- Bring the water to a simmer. Stir chocolate continuously until it has melted fully.
- Now is the tricky part. You need to bring up the temperature of the chocolate to 48°C if you are using dark chocolate. (45°C if you’re using milk chocolate).
- Remove the bowl from the saucepan.
IMPORTANT: Make sure not a SINGLE DROP of water gets in the melted chocolate, or you can just chuck it all away as it will be completely ruined. - Now, while you slowly add the remainder 60g of chocolate while stirring continuously, you need to get the temperature of the melted dark chocolate to 29°C (27°C if you’re using milk chocolate).
- Once you have gotten the melted chocolate down to 29°C/27°C, you need to raise the temperature of the melted chocolate up again by placing the metal bowl on the saucepan of water like in (2). Raise the temperature of the chocolate to 32°C (30°C for milk chocolate).
- Your chocolate is now tempered and ready to be worked. You have to now very quickly take a spatula and spread it on the parchment paper/silicone sheet. Spread them however you like as you will be breaking them to shards once hardened.
TIP: Spread it about 2mm thick, and in long and narrow batches (sort of like a short ruler). - Place the paper/sheet in the fridge until hardens and easy to break into shards.
I know the chocolate shards is kind of tricky to make, but if you are very precise and patient, you can do it! Hubs and I did it the very first time we tried. You can always skip this and just spread raspberry compote on the cake only. The chocolate shards just makes the cake look prettier.
Do leave comments if you need to ask anything. I will try to answer the best I can! (^_^)


Hardwork man to do this! You guys are fantastic
Yeah.. it was so hard I don’t think we will make it again anytime soon unless really got the mood. (^_^);
Ha ha I got tired reading the recipe